Creating Digital Environments
Live-Action Set


general steps taken
Brainstorm
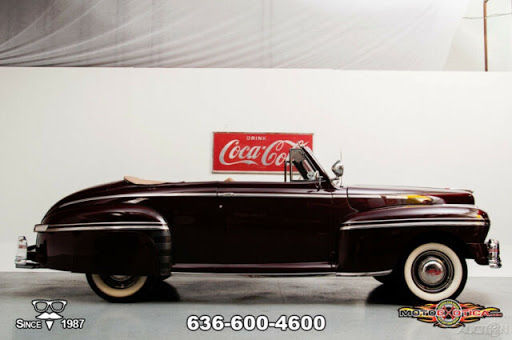
Gathered reference and studied the images I gather to see the best way I
could reverse engineer the 1946 Mercury Eight Club Convertible.
Shoot
Took my background image early on to be able to drop my model as I made progress.
Model & Surface
After some NURBS modeling practice, I started modeling and surfacing to see how my model was looking overall/
Lighting & Rendering
Started with general lighting, then rendered my model and comped it into my background image.
REFERENCES


STEPS breakDOWN
1.
When I first chose my image, I had imagined I was going to have a pretty effortless time thinking modeling an automobile with NURBS would be quite straightforward and the flat camera shot would make the comp process a breeze. However, I didn't consider the complications that can arise when dealing with a flat angle. Because of this, I made sure to gather references that gave me a look at the other sides of the vehicle I was missing.
2.
After studying my references and creating a plan of attack for my modeling process, I went ahead and started messing with the NURBS tools to get familiarized with them.
Started getting used to the tools available to create surfaces from curves. I had initially thought that, like with most things, I would have a better workflow if I were to start modeling the big parts of the vehicle and moving on to medium-sized ones, etc. Although, after attempting to build a few parts without much success, I noticed there were parts of the car that could serve as a guide to help me build the more complex parts.
For example, in my scene, we see a metal lining that runs along the side and hugs the hood of the car. This piece eventually helped me build the hood of the car since it gave me the dimensions of the curvature I was missing. After noticing this, I started using ceratin car parts to my advantage to attempt building the most accurate surfaces.
3.
After many trials and errors of manipulating curves to build my surfaces, I was able to get a better idea of what each curve tool did and also the best use for them. This also led me to notice that there were car parts I had thought of separating but they could easily be made into one by using a specific tool.
Unlike polygonal modeling, NURBS work best when first laid out on a plane and then modified to stretch out into its dimensions. I had to pay extra attention to this concept since there were some parts that looked right without stretching but were not accurately following the structure of the car. For instance, when I was first building the windshield, I only noticed it needed to be angled after cross-referencing with the other views of the car.
4.
Before moving too far along the project, I went ahead and planned to photograph my background. As you can probably tell my background are train tracks meaning I may have unknowingly broken the law for this project. Funny enough, if you zoom in just enough at my photograph you can spot a construction worker kindly askingme to get off the rails. Thankfully, this idn't happen until after I was able to get a shot that I was
5.
After I was able to get a good frame down for my car, I started "stitching" the pieces together. In order to keep the pieces easy to modify I kept them as their own geometry but made sure vertices were lining up.
Initially, I had thought switching from NURBS>Subduv>Poly would make the stitching process easier since I wouldn't have to mess with individual vertices. However, after attempting to switch from these surfaces with a few meshes, I started noticing some artifacts were projecting into those meshes whenever I reopened my file. As a result, I started and kept almost all my meshes as NURBS throughout the process.
6.
The birail and loft NURBS tools were basically the two main tools I used to put my car together, but more specifically, for the bigger curved surfaces like the hood and the wheelhouses. As for the medium-sized parts, like the windshield and car lining, the revolve tool came in handy.
Afterward, I began to model the smaller parts like the headlights, the bag at the front, the mirrors, and other small metal parts around the car. These car parts were built with a combination of the tools mentioned earlier, for the exemption of the bag. For that part in specific, the sculpting tool seemed the most efficient approach so for that model I began with polys and then converted them to NURBS.
7.
At this point, I had a good portion of my modeling done so I went ahead and moved unto surfacing in order to see if there were any major miscalculations. I dropped an HDRI and attempted to replicate the specular seen in the car to take notice of the light interaction with the car's curvature.
Surely, after noticing that some of the reflections were off, I went back and tweaked different curves to get a better frame of the car. The lack and excess of reflections really helped me figure out where my curves needed more modifications. Unfortunately, I was stuck in this stage for a while since I soon realized I had mainly. modeled off one of my references since it was better lit but then ran into issues with dimensions since the cars were photographed at slightly different angles. In order to avoid starting from scratch, I mainly edited my surfaces through their curves.
8.
Even though the surfaces did not end up perfectly lined up, for time management purposes, once I felt comfortable with the progress made, I moved on to tweaking the shaders further. I played close attention to the detail seen on the car parts.
For the mirrors, I made sure they were darker than the other silver parts but also had a variation of specular on both in order to show the reflection of light. For the hood, I wanted to make sure that the metal was a dark material that kept most of the right side of the hood in shadow but also reflected light coming from the lefthand side. And so on, I looked closely at each part to see what attributes had to be modified in order for them to interact well with the light and blend in nicely inside the scene.
7.
After I felt in a good spot with my models, shaders, and light, I tweaked the camera settings to try to match the shot of the scene as close as I could. This was the second time I noticed that the flat shot was a bit trickier than I had initially suspected. In the end, I ended up saving multiple renders with different camera settings to try and figure out which ones gave the closest shot replica.
Eventually, I was able to get a good angle of the car, and while it didn't stack perfectly on top. it came close. As the last step, I put in some preset settings in Photoshop to set up the dimensions of the shot, resolution and also made the project black and white. Lastly, I removed the background from my render, dropped in a layer, added my photograph as well as the scene, and tried to line up all the as close as I could.
BACKGROUND IMAGE
(slide)

